
Building a Home Theater, Part 6
Jul 20, 2009 1:21 PM,
By Jason Bovberg
Building a New Home Theater Series
The theater is finished. Since my last installment, which itself chronicled some final touches such as the installation of sconces and media shelving, three final things happened to catapult this theater from “full of potential” to “fabulously finished.” Those three things are trim installation, carpeting/furniture installation, and equipment setup. I am now enjoying a completed theater that fully lives up to—and even surpasses—my original expectations when I conceived the project.
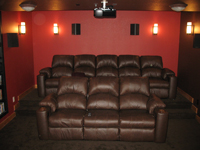
As you can see in the photos accompanying this article, the theater has suddenly transformed from a work-in-progress to an actual theater. I find it amazing that it took only some relatively minor effort, right at the end, to effect this transformation. For example, compare my photos from last month’s article with these, and you can see the enormous impact that the black trim around the media shelves—and the displayed DVD collection itself—has done to the entire room. The trim makes everything pop, providing rich contrast with the red wall and giving an array of clean, stark lines to the room. Also, check out the custom loudspeaker grilles that we’ve attached to the screen wall. These are simple solutions, wood frames with acoustically transparent loudspeaker fabric stapled to them (see detail in part 5), and yet they complete the professionalism of the screen wall.

Next up was carpet installation. I had chosen a dark-brown, low-nap carpet from a tiny sample, so I was anxious to see how it would work with the color palette of the room and with the theater furniture to come. I was so close to the end and yet so much was in the air. Would the look come together as I hoped? Would the sound-absorptive/sound-reflective properties of the room be in balance? I would answer all those questions in a matter of days, and yet I know something could go wrong or just feel off at any of these final stages.
The carpet guys took two days to finish their work in the basement; the job was a bit involved, as they needed to carefully sculpt the carpet not only to the rear seating riser but also to the curved stage area beneath the screen. They did slow, careful work, and I’m pleased to say that their professionalism and the carpet choice itself has resulted in a very fine look for this theater, perfectly complementing the design of the room. (The carpet even has a subtle diamond pattern that takes me back to the days when I worked at a similarly carpeted movie theater in southern California.)

The same day the carpet installers finished their work, the furniture arrived. To my delight, the seating fit nicely into the room, complementing the existing color palette. The seats were also extremely comfortable. Because of room-width constraints, I went with interlocking furniture as opposed to separate two-armed recliners. The solution works well, the only drawback being that if I have a full house, the people in the middle seats don’t have a cupholder. However, I have drink holders on the four ends, and five of the eight seats do recline—the four ends and the middle front. Also, with the furniture installed, I was finally able to completely ensure that I’d built my riser high enough: It was perfect at 12in. (And I’m glad I figured that height out mathematically in the beginning rather than going with my gut instinct of 8in.)

In one of the photos, you can see the subwoofer enclosure still open as I tinker with phase control. That was my next step: installation and setup of the equipment that I’d had sitting around for months, waiting for a room to shine in. With the equipment rack in place and carpet and furniture installed, the room was ready to play movies. My first step was to install the Atlantic Technology loudspeakers, then follow that with the installation of the new Pioneer Elite SC-05 receiver. Immediately, I was extremely happy with myself for arranging easy access to the equipment rack from the rear. (In one photo, you can see the Raiders of the Lost Ark poster that’s this hiding rear-panel access.) Loudspeaker wiring was painless, and I followed it immediately by installing my Samsung Blu-ray player and Toshiba HD DVD player. After hooking up my Xbox 360, I turned to the Panamax power conditioner, plugging it into the wall panel and connecting everything else—including the electrically bridged projector—to it. Now everything in the isolated theater circuit was protected from power surges. However, before setting up the projector and screen (which would hide the center channel), I tested some raw audio output from a CD. All was OK.
Now I was ready to install the projector and the screen. I had never had any experience with front projection, so I forged ahead with only the research I had done online and the user’s manual. I easily attached the projector mount to the ceiling—again, glad that I’d had the framers attach a series of extremely stable 2x4s to the metal beam in the ceiling—then mounted the projector so that its lens was 12ft.from the screen and in the precise center of the room. Next, I assembled the 108in. screen and mounted it to the wall, a procedure that required the help of my contractor to stretch it into sheer submission.
I was ready.

Modern receivers are marvels of setup simplicity, and I spent a small amount of time walking through the automated audio setup, which is performed with the use of an included microphone that you mount at the sweet spot—typically your favorite viewing/listening spot at the center of the room. The receiver cycled through a series of test tones and automatically tuned itself according to room acoustics and loudspeaker placement. The receiver even displayed its results, accurately determining the distance between me and each of the loudspeakers, and a host of other details. The bottom line is that my Atlantic Technology loudspeakers now sound better than they ever have.
Now it was time to configure the projector. Initially, of course, its image was upside down (because of ceiling installation), out-of-whack, and wildly out of focus. I quickly righted those aspects of the image with the user-friendly remote, and I soon found myself with a brilliant, blazing, very large image. Although I don’t have an official HD image-calibration disc yet, I made do with the calibration tool on Disney’s eye-popping Ratatouille disc, which let me adjust brightness and contrast so that it suited my completely dark room. For color and hue, I decided to use recommended settings from Projector Central. After that, naturally, I couldn’t resist watching the film, and I was instantly gratified by the image. This is truly a theatrical setup, and the sound was also vivid and rich.
Now I watch movies almost every night, and I’m hankering to invest more heavily in the Blu-ray market. I also continue to purchase cheap HD DVDs from Amazon (as low as $3). Hey, HD is HD, no matter the brand. (I might want to buy a backup player while they’re still around.) Now that the project is over, I’m extremely thankful that I found a contractor who was open to my own collaboration in the project. He did what he was best at, I offered ideas and performed necessary research, and I was able to do what I could to keep costs down. And I never sacrificed my initial vision while doing so. Let me know what you think.
Jason Bovberg (
) is a senior editor for
and
SQL Server
magazine and a regular contributor to
Residential AV Presents Connected Home
. He specializes in networking, mobile and wireless, hardware, and home computing. He has more than 15 years of experience as a writer and editor in magazine, book, and special-interest publishing.


